
Discover the unique craft of embroidering on clay with our easy step-by-step tutorial. Perfect for creating one-of-a-kind jewellery!
Are you ready to elevate your crafting game and create something truly unique? I’m thrilled to share an exciting project that combines the timeless art of embroidery with the versatility of air-dry clay. Inspired by my love for paper embroidery crafts, I’ve discovered a new way to bring this art to life. Introducing Embroidered Clay Pendants!
These stunning pendants are an excellent way to craft beautiful, one-of-a-kind jewellery pieces on a budget. You can quickly transform simple clay discs into wearable art by pre-punching holes for the thread, just like in paper embroidery. Or you could use the embroidered clay to create a unique Boho-style wall display.
Experiment and Templates:
If you’re new to this craft, I recommend experimenting with different embroidery designs on paper beforehand. This allows you to perfect your designs before committing to the clay.
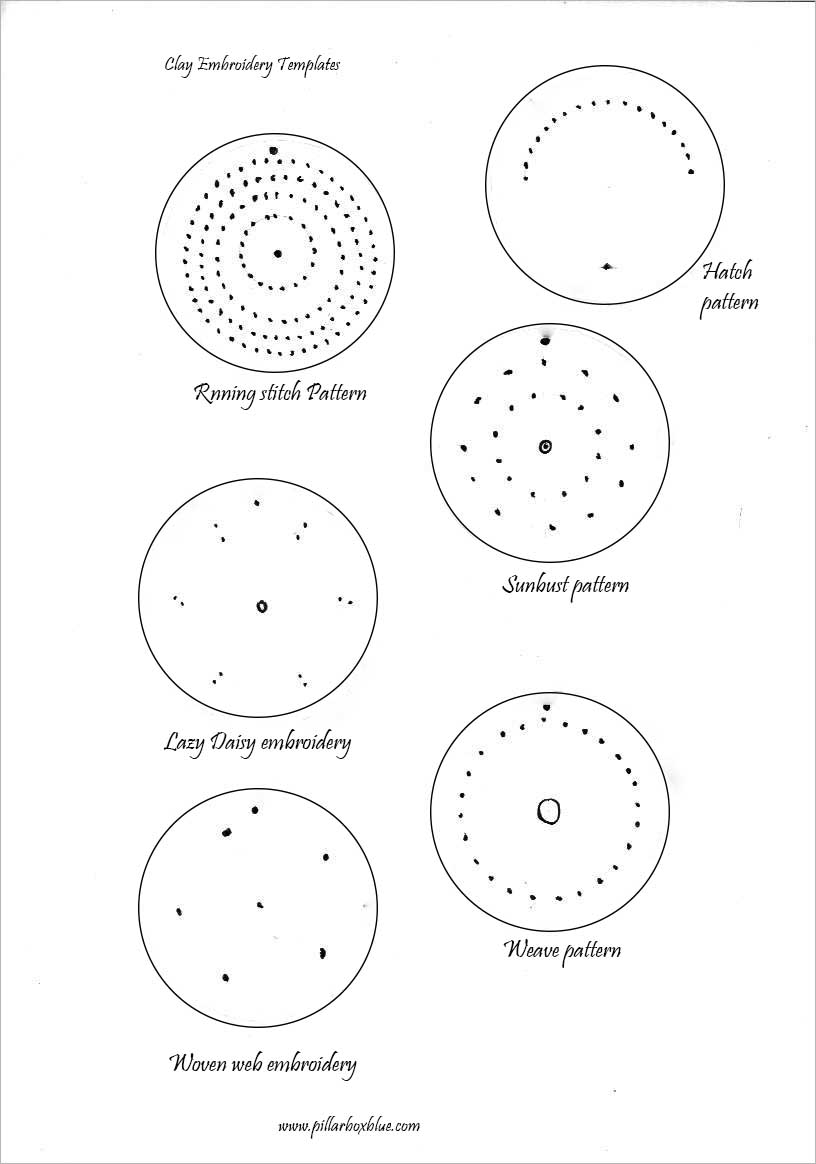
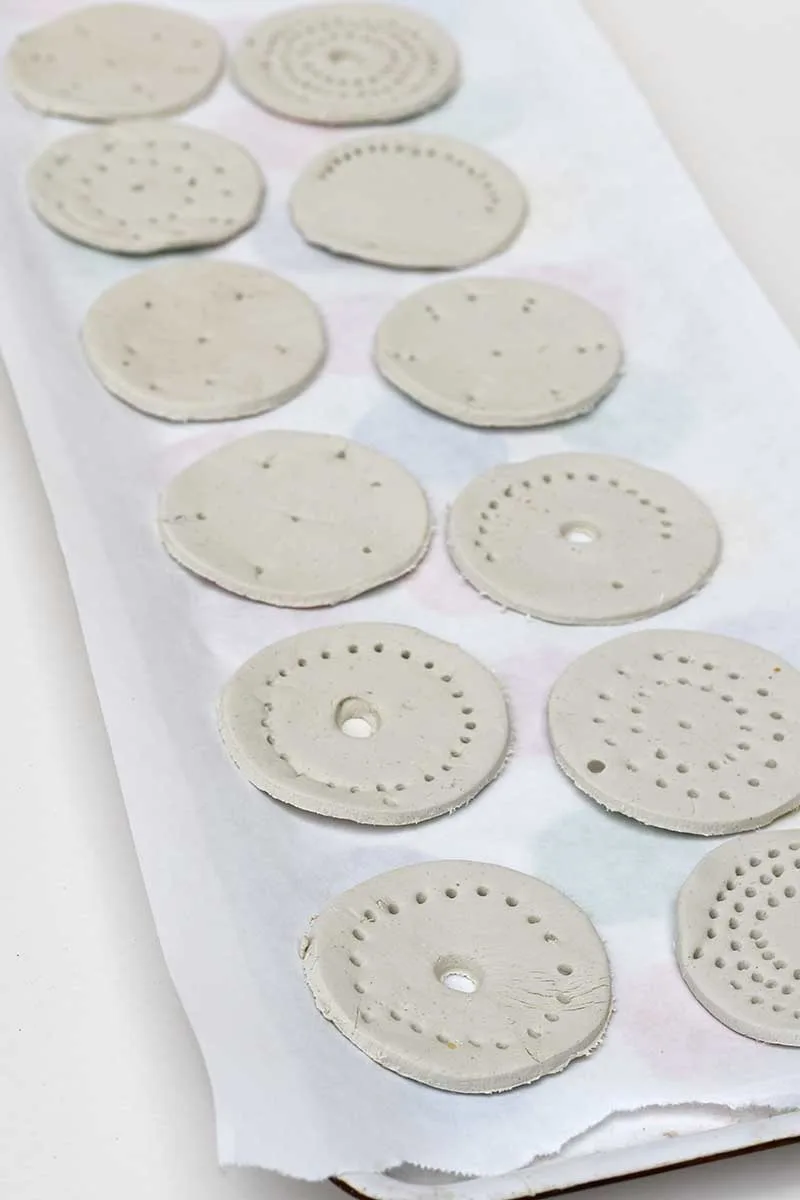
To make this process easier, I provide pattern templates for punching the holes for six different pendant designs I frequently use. These templates are perfect if you don’t want to design your own or need inspiration.

We’re a participant in the Amazon Services LLC Associates Program, an affiliate advertising program designed to provide a means for us to earn fees by linking to Amazon.com and affiliated sites. As an Amazon Associate, I earn from qualifying purchases.
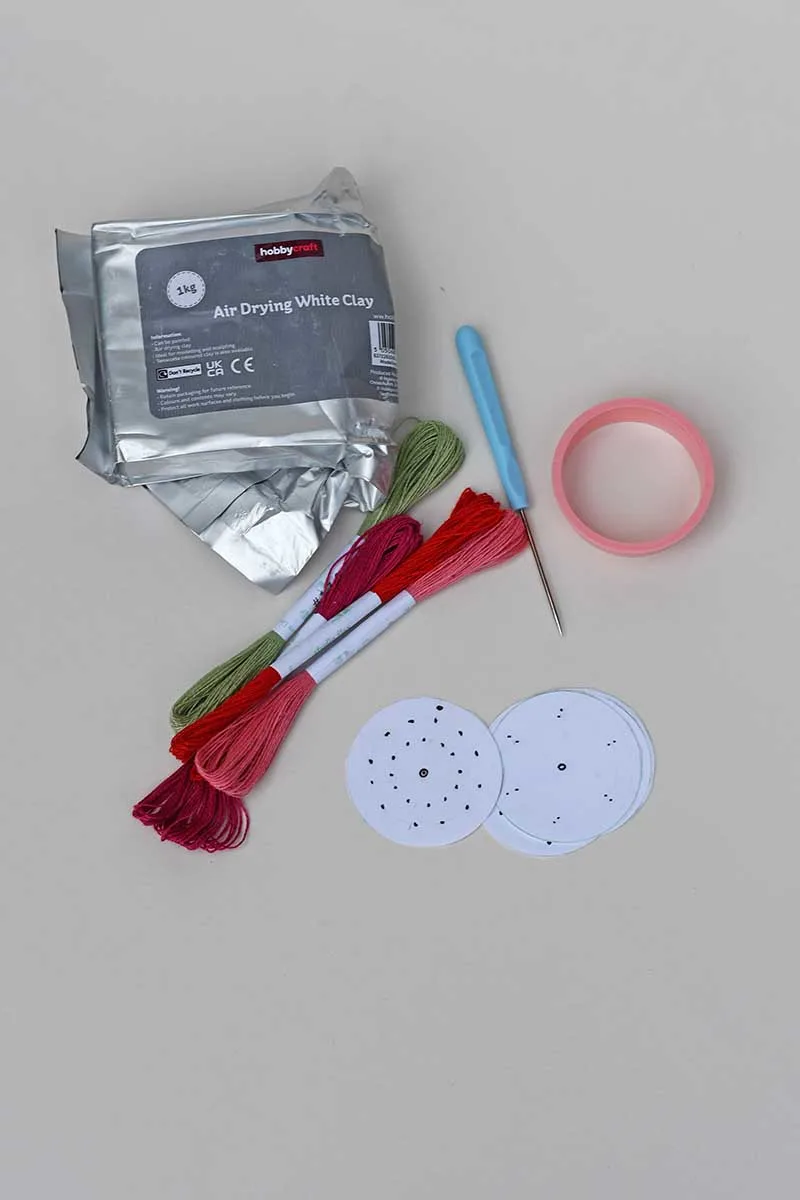
Materials Needed:
- Air-dry clay -white
- Embroidery thread (various colours) and needle
- Rolling pin
- Round cookie cutter or clay cutter
- Sandpaper
- Jewellery findings (jump rings, necklace chain or cord)
- Awl or toothpick for pre-punching holes
- Free paper template design
- Foam board

Step-by-Step Instructions
Preparing the Clay
Step 1: Use a rolling pin to roll out a piece of air-dry clay to about 5mm (1/4 inch) thick.
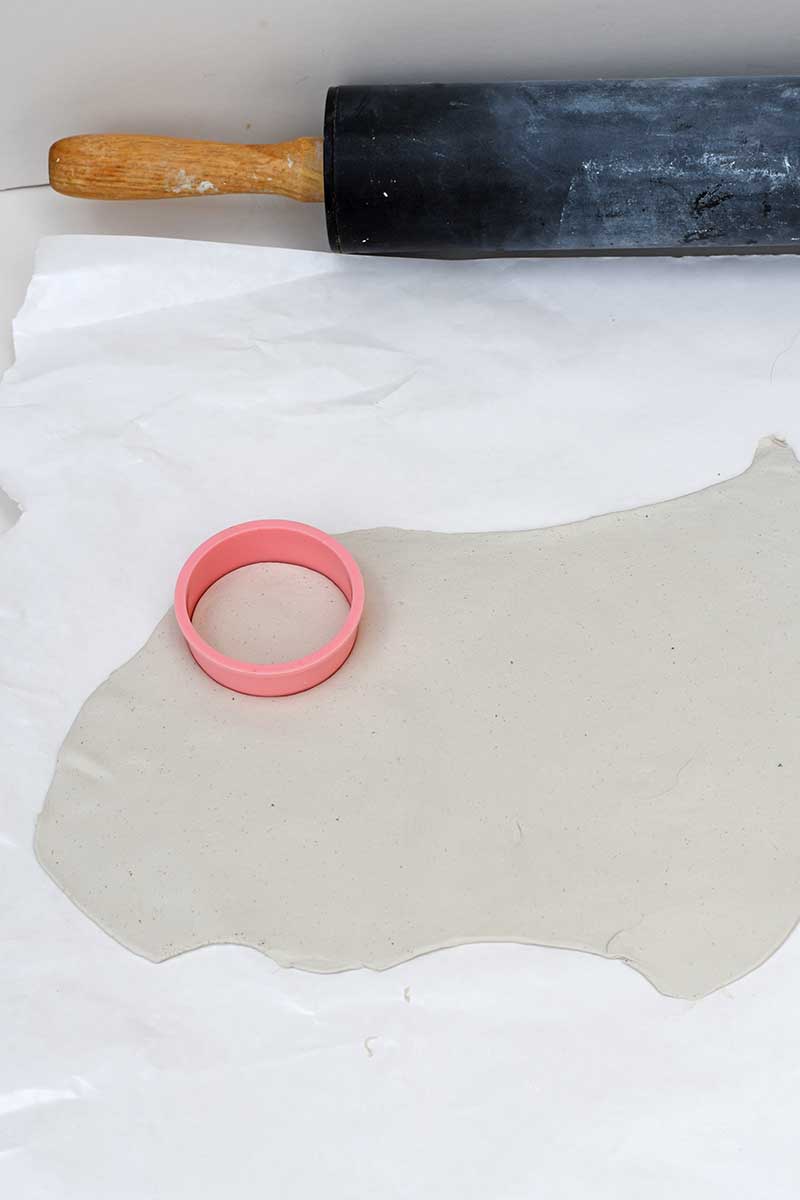
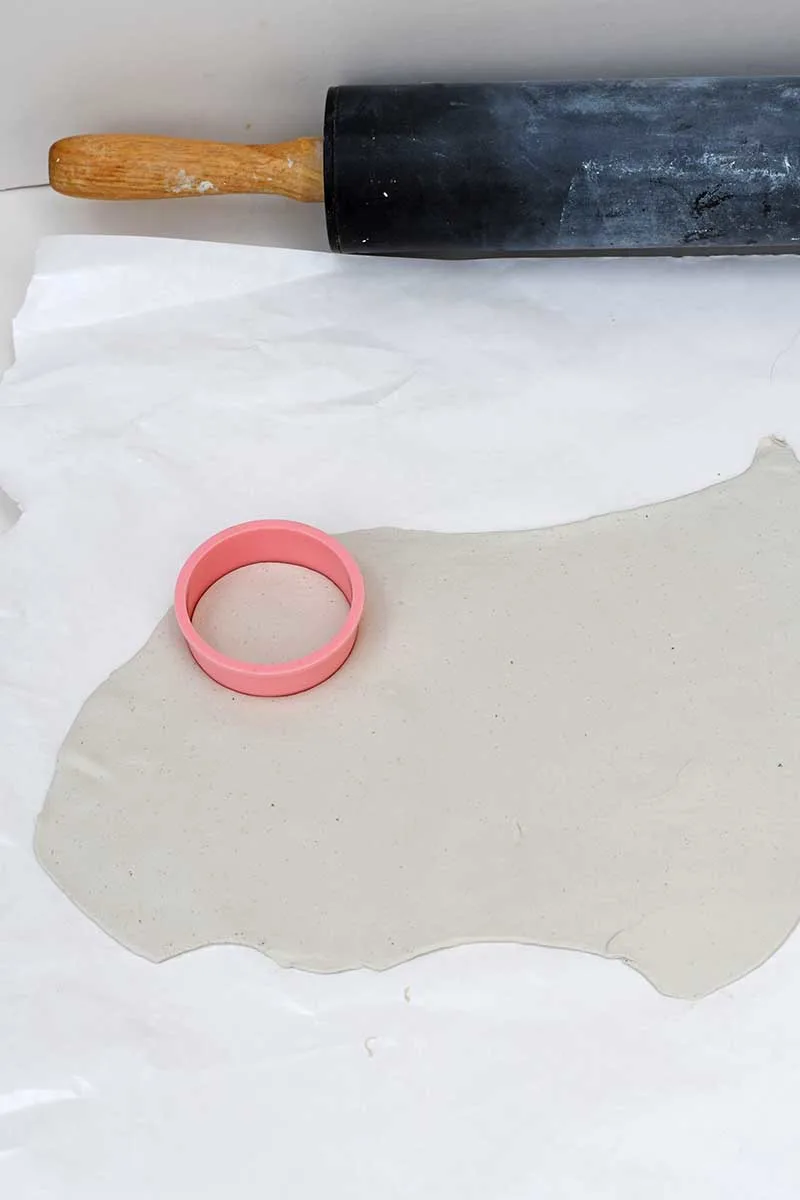
Step 2: Place the round cookie cutter on the clay to cut out your pendant shapes. Experiment with shapes like hearts, stars, or irregular shapes for a unique touch.
Step 3: Place the paper embroidery template on the round clay and use an awl to punch the holes. Like with paper embroidery, placing the clay on a foam board before punching the holes is best.
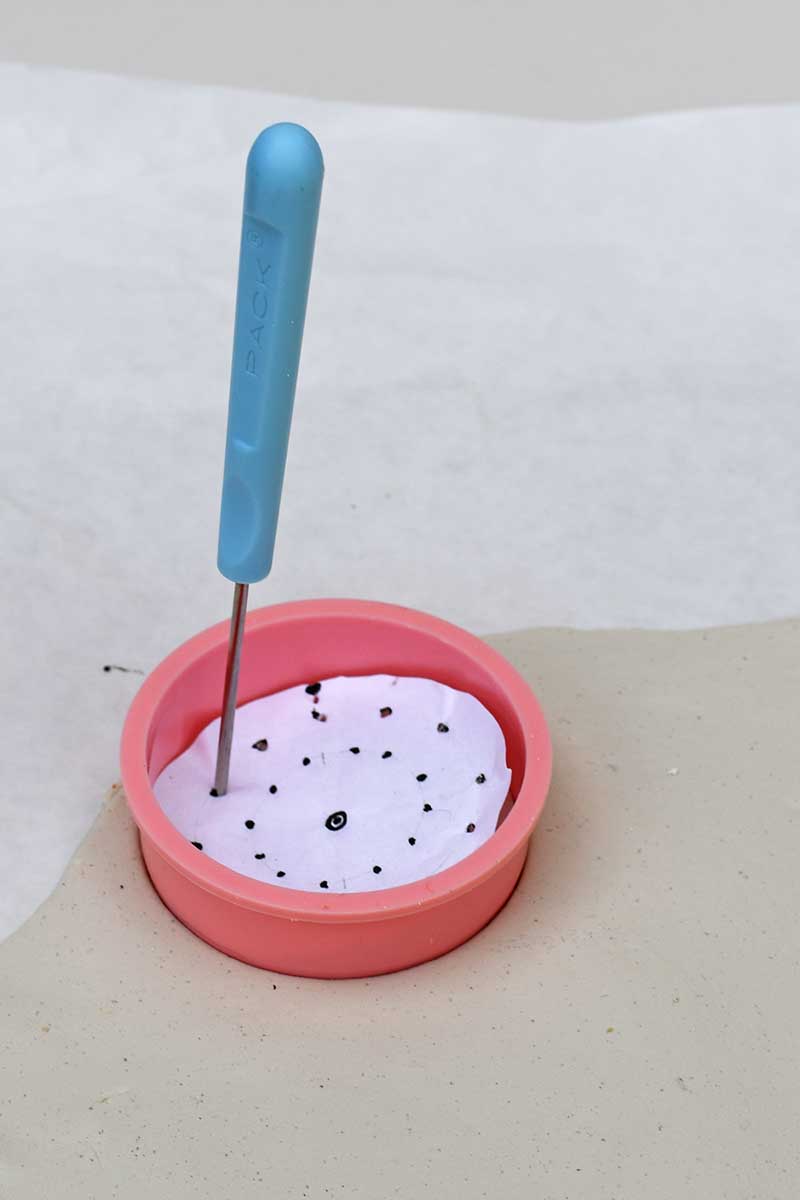

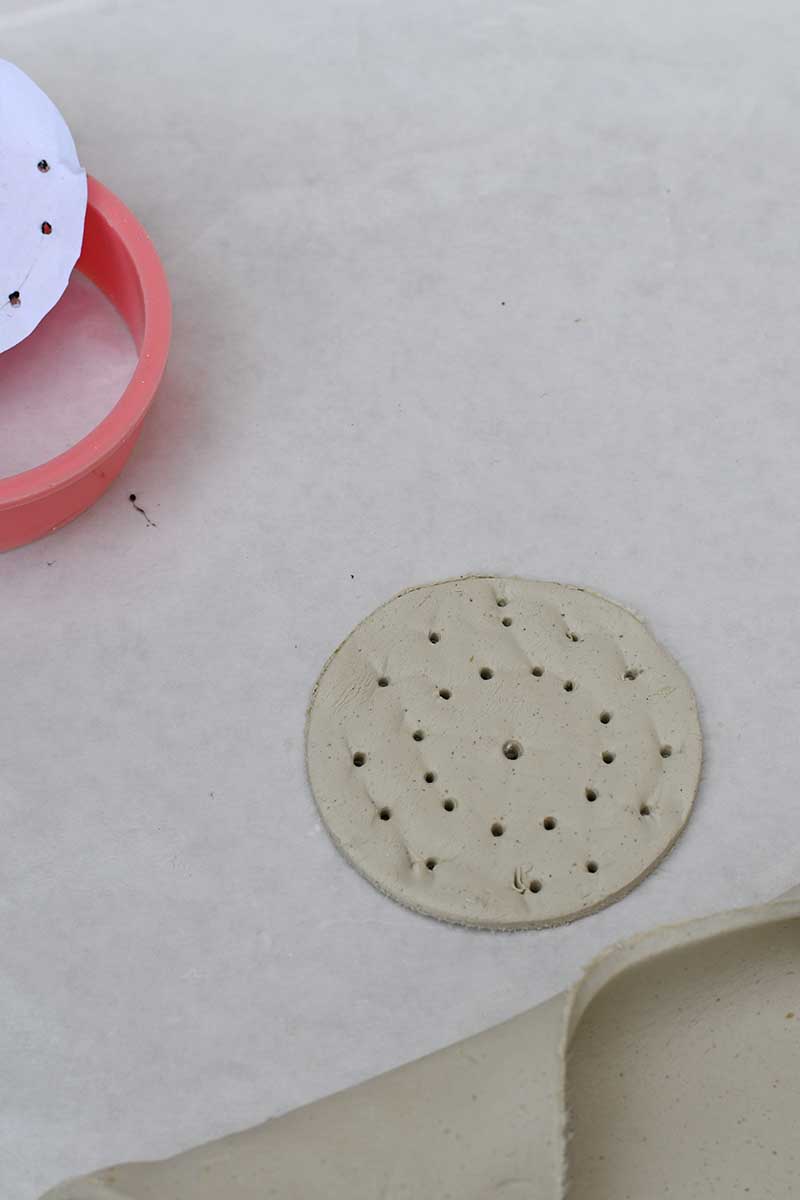

Step 4: Make sure there is a hole in the top of each pendant for hanging. Then, leave the clay discs to dry according to the package instructions. Depending on your climate, this usually takes at least 24 hours.

Step 5: The air-dried clay will turn whiter as it dries. When it is dried completely, smooth the edges of the discs and faces with sandpaper. This is the time to paint the pendants.
Embroidering the Clay
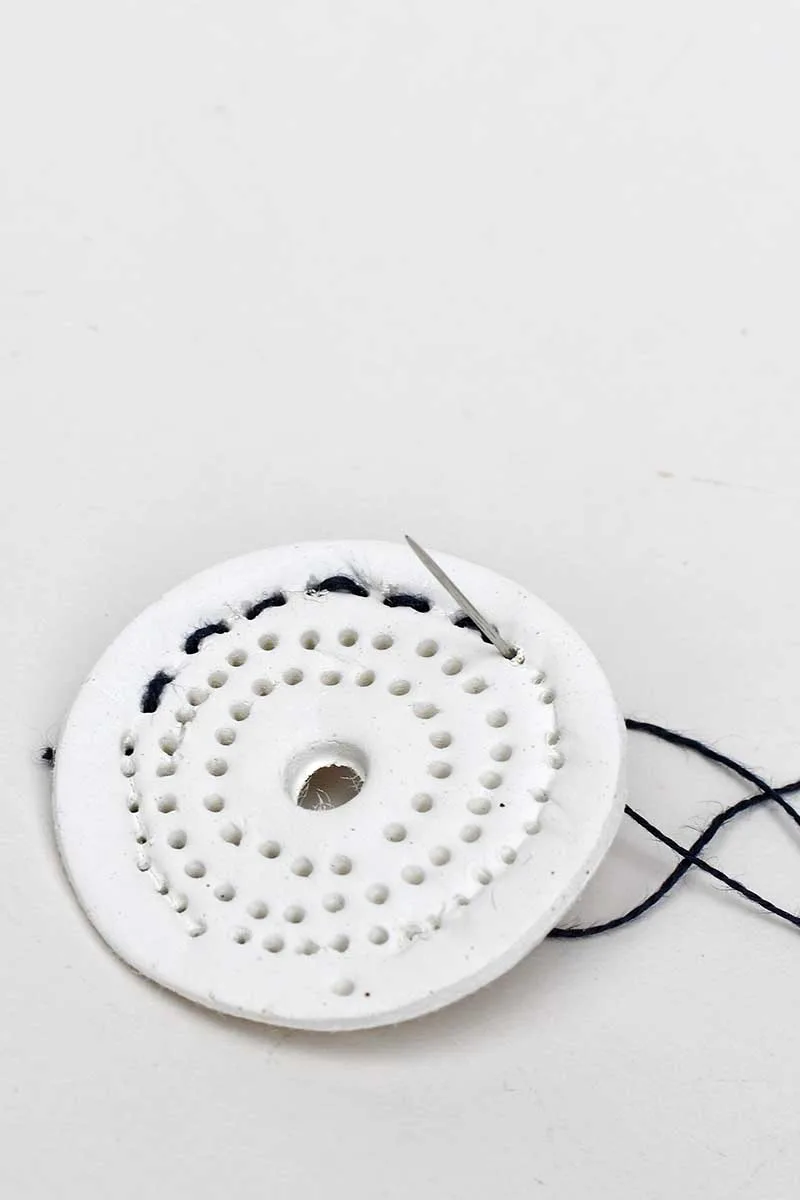
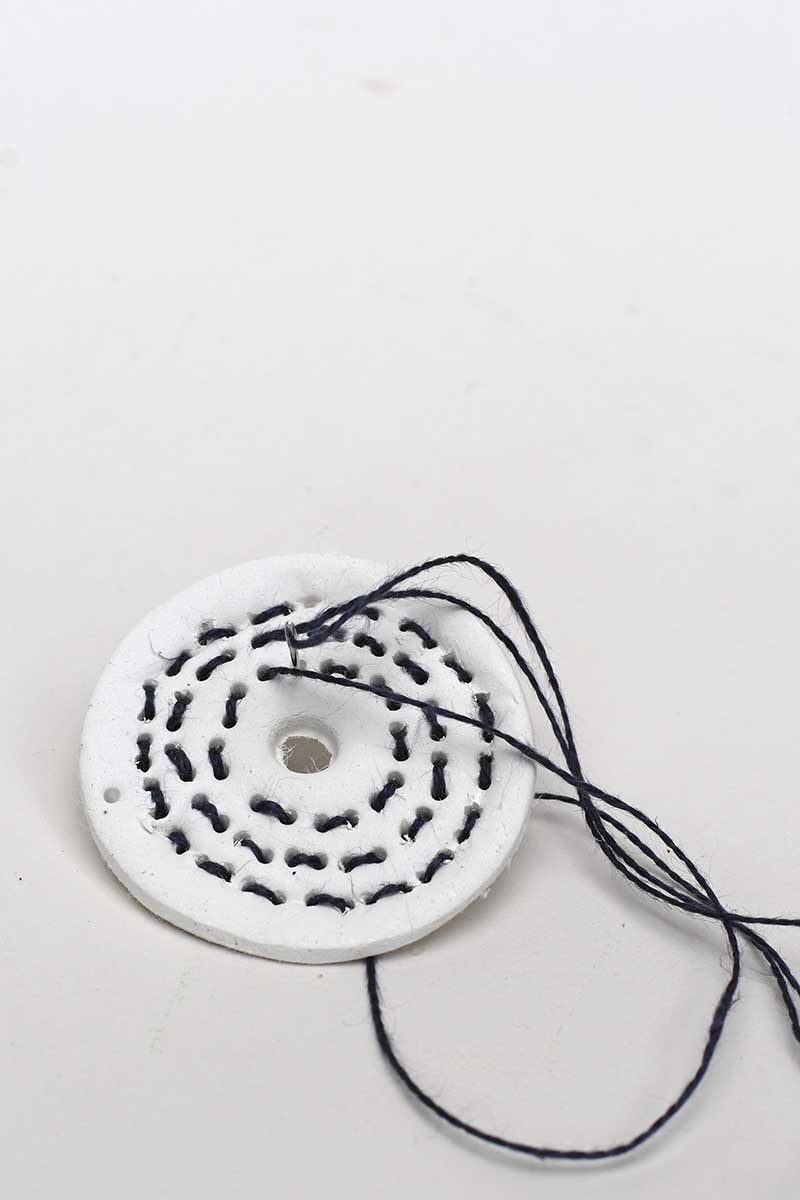
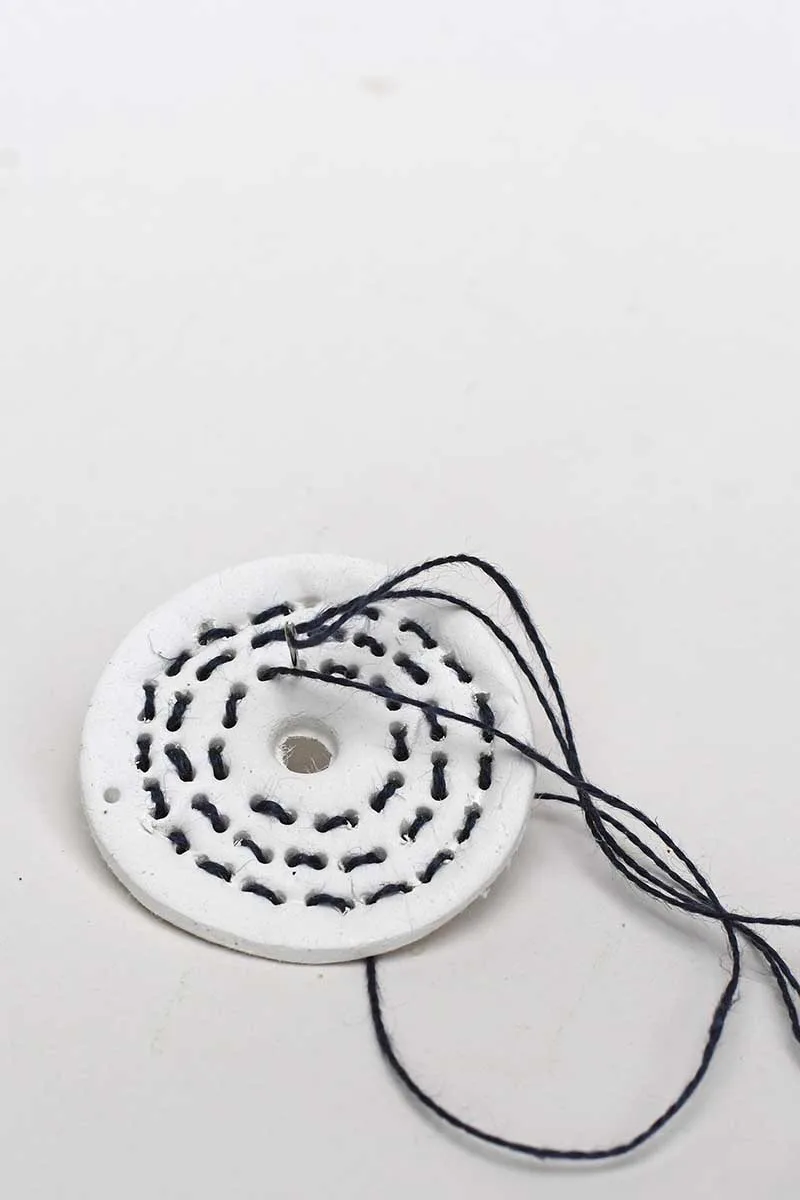
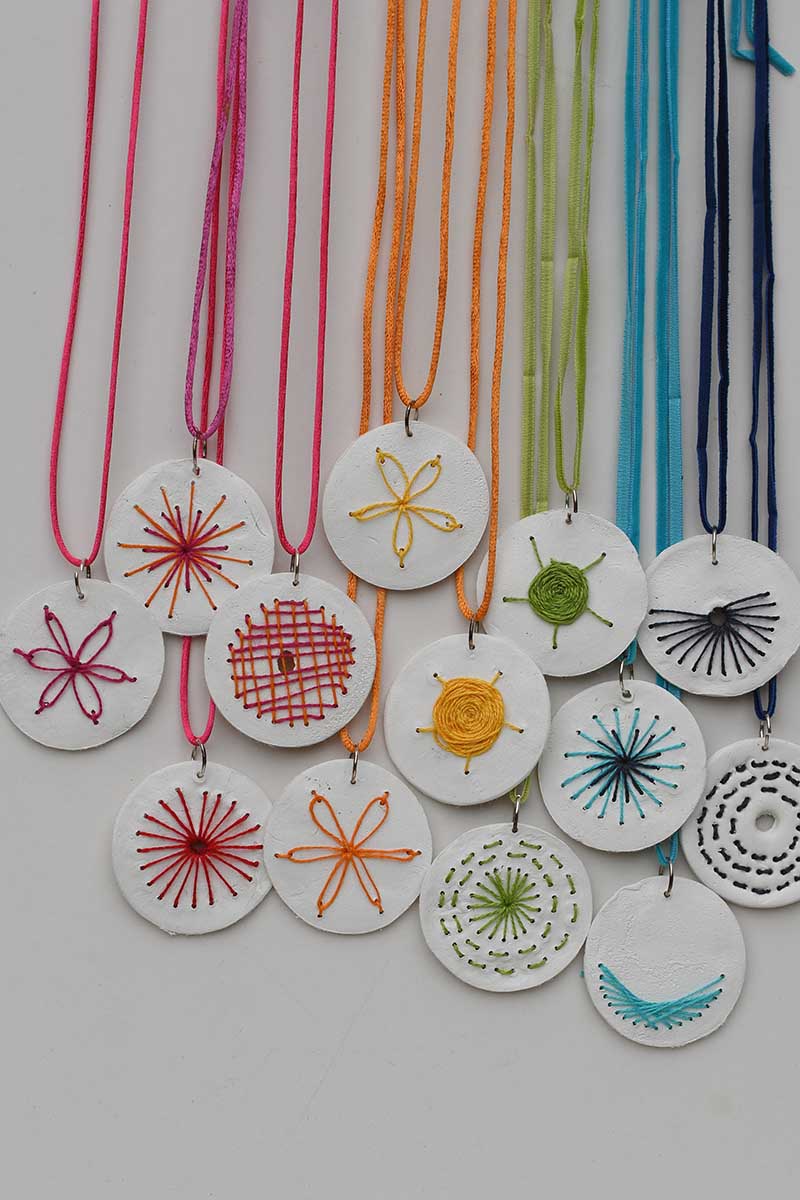
Step 6: Use an embroidery needle to stitch your chosen design onto the clay carefully. Start with simple patterns like flowers, geometric shapes, sunbursts, and running stitches. Below are some of the patterns I embroidered on the clay.
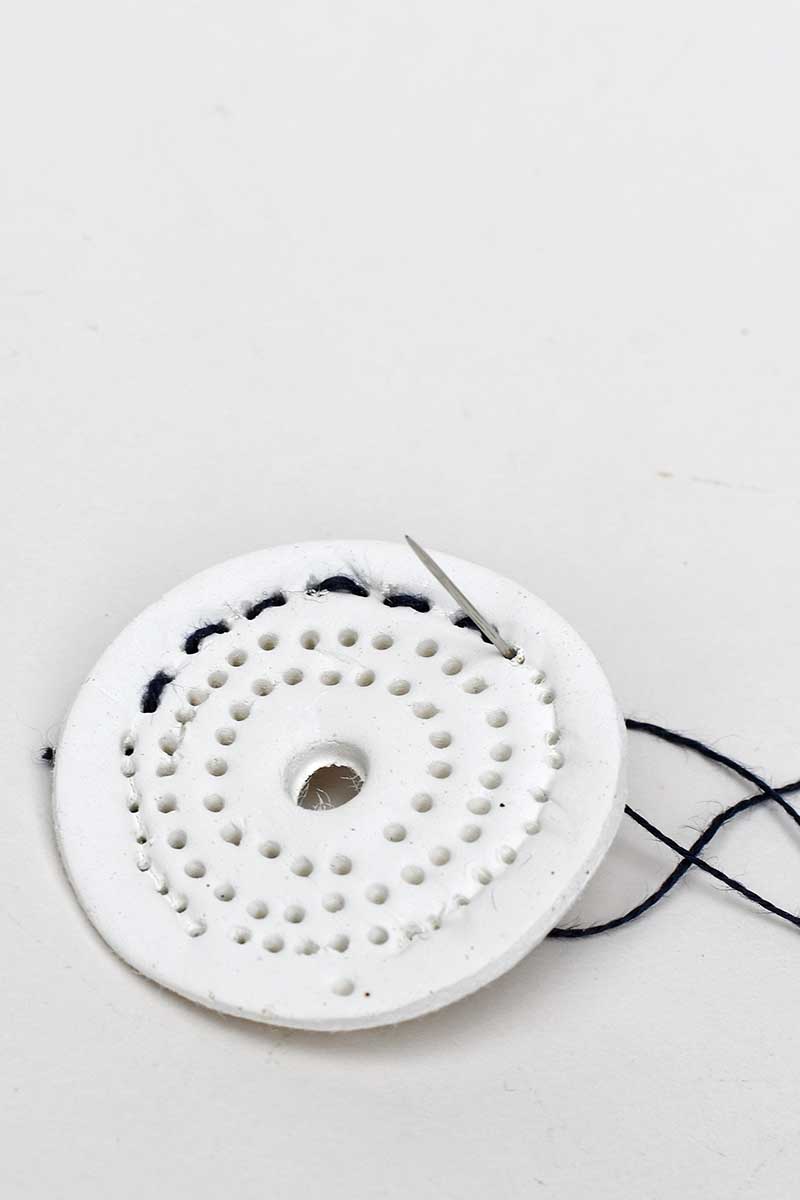
The clay pendants will have flat or rounded sides. Decide which one you want to be the face of your jewellery. Then, start stitching from the back to the front. As with paper embroidery, you can secure the end of the thread with either a knot, glue, or tape. The holes in my clay weren’t too large, so I used a knot at the end of my thread.
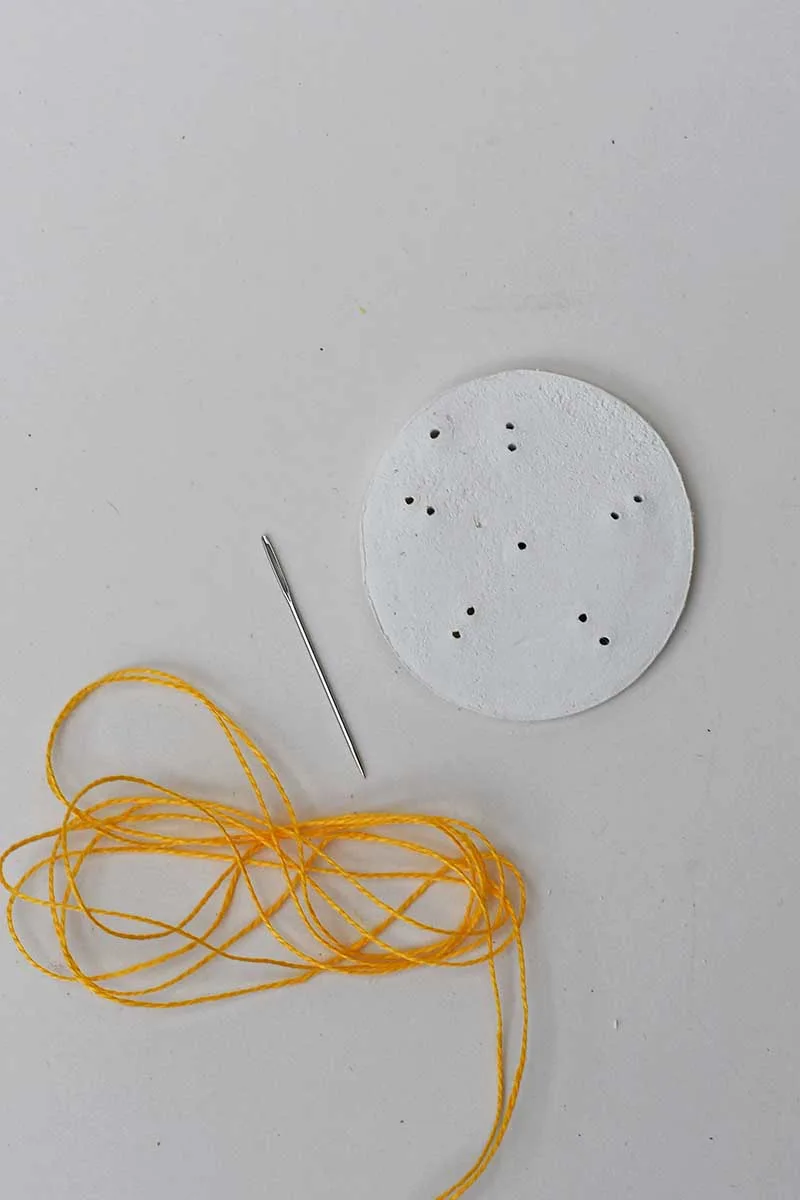
Simple Running Stitch Design
This is the most straightforward embroidery design on the pendant with the most holes. From the back, thread the needle through one of the holes, then back through the next. Repeat until all the circles are complete.
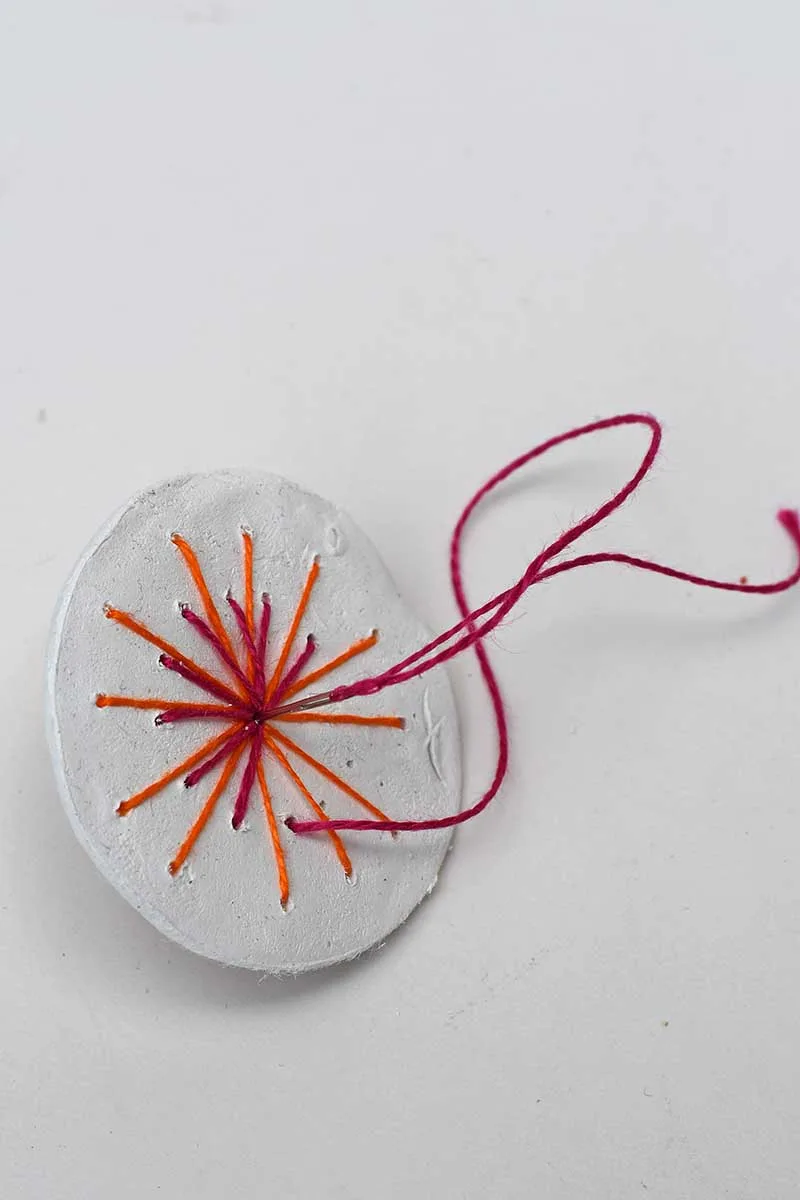
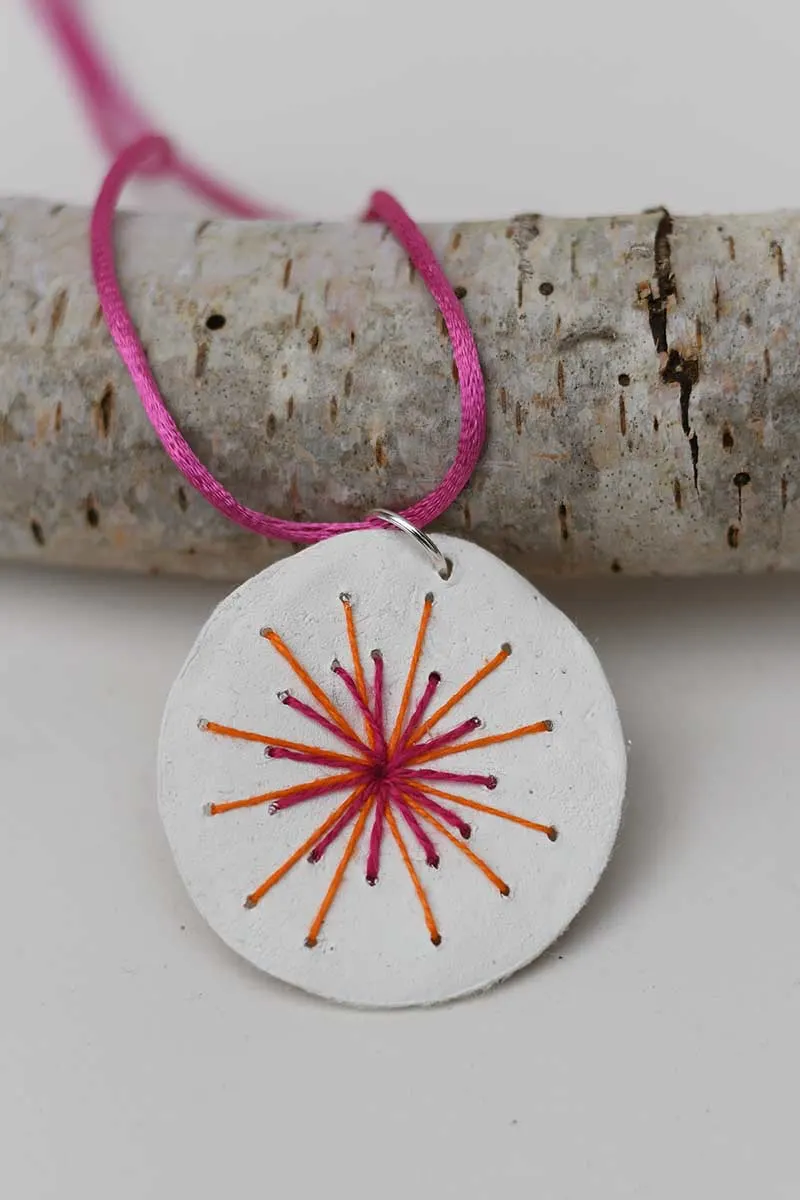
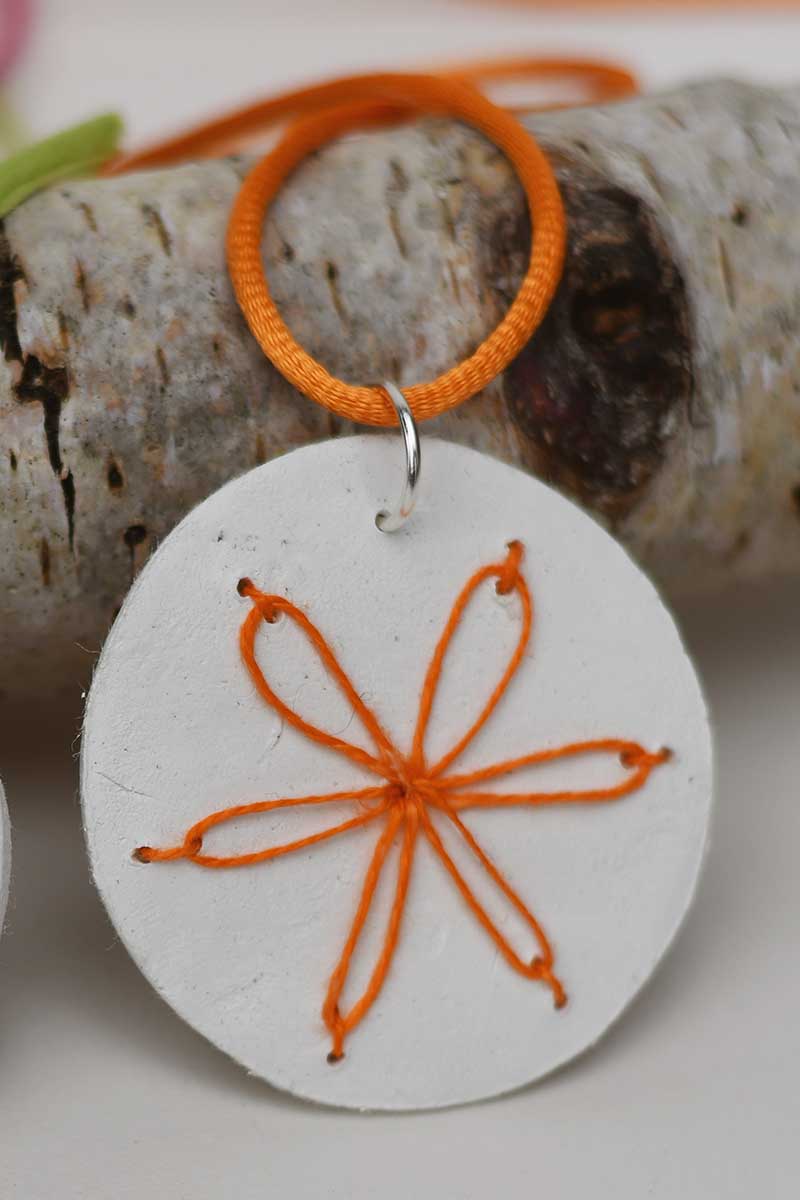
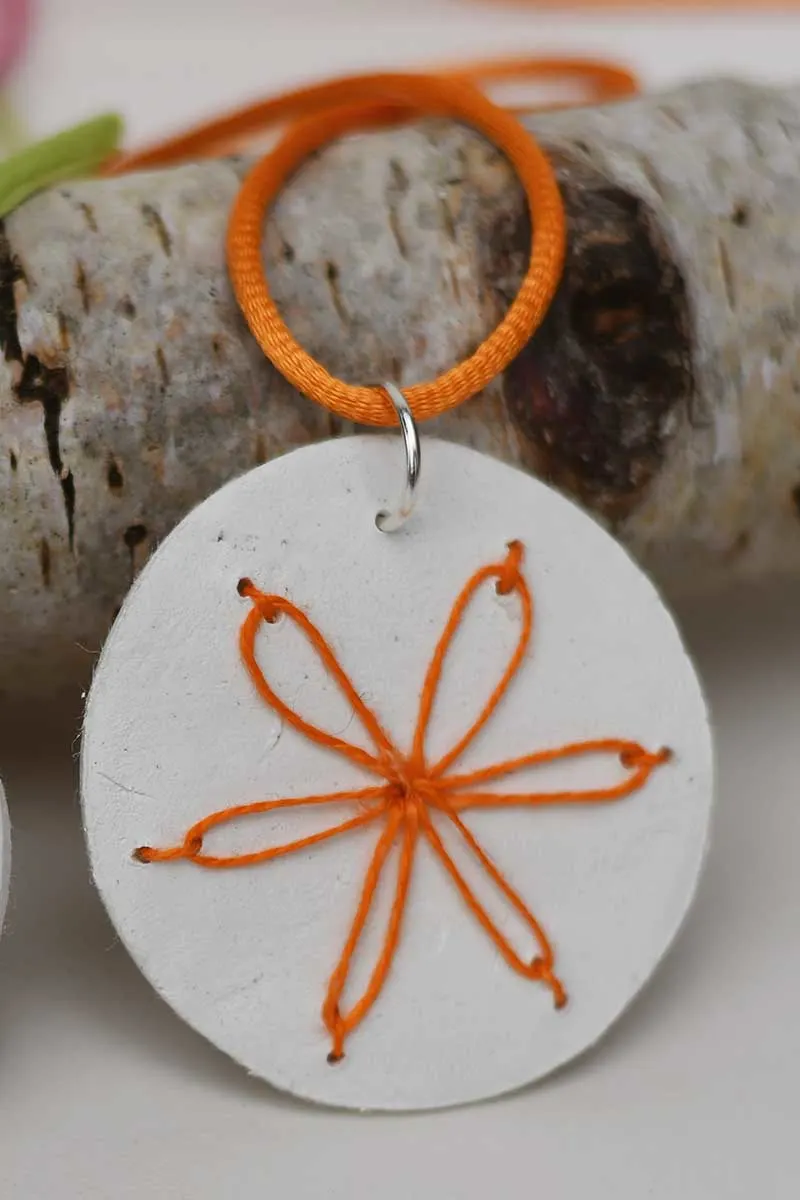
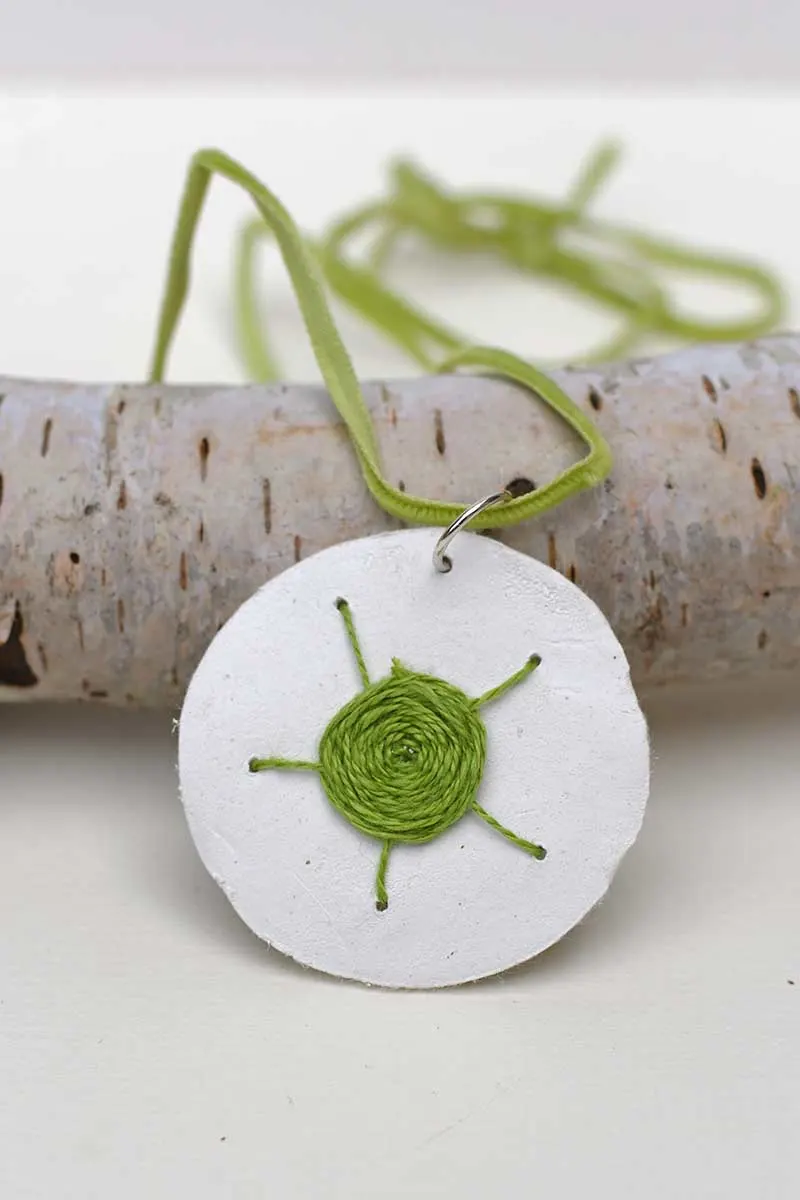
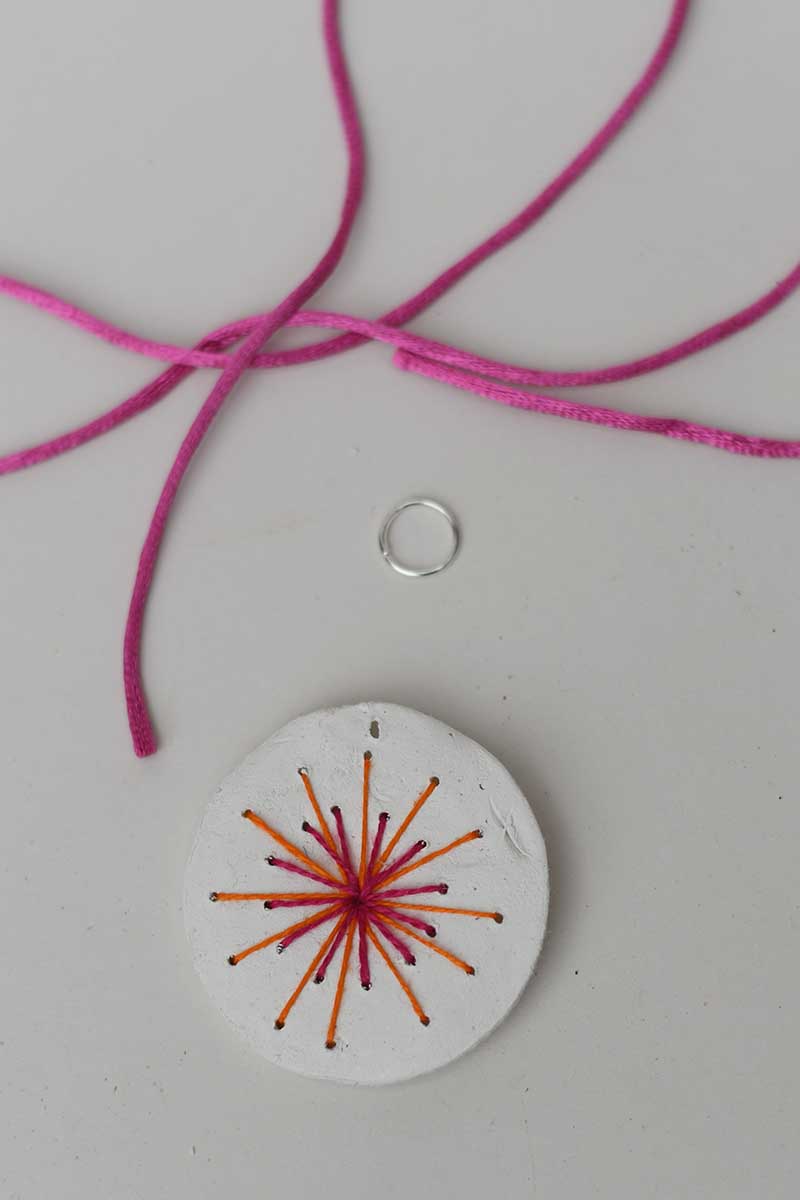
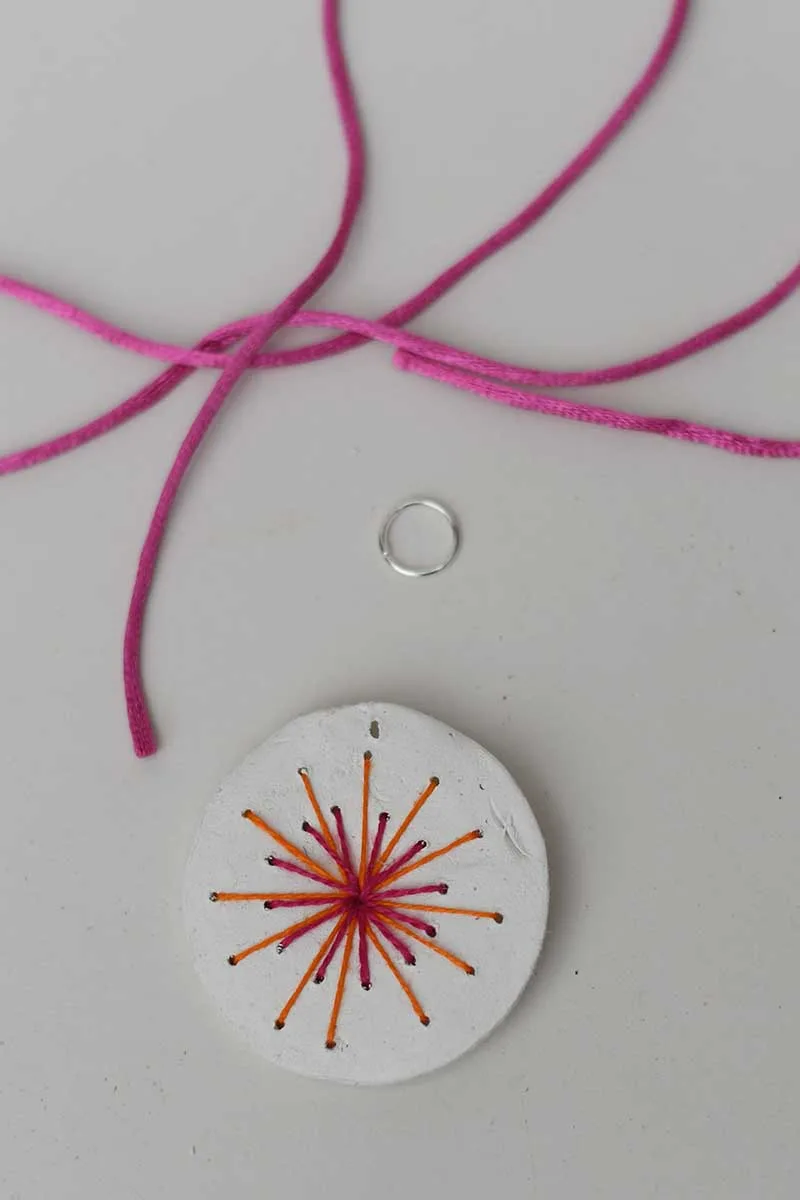
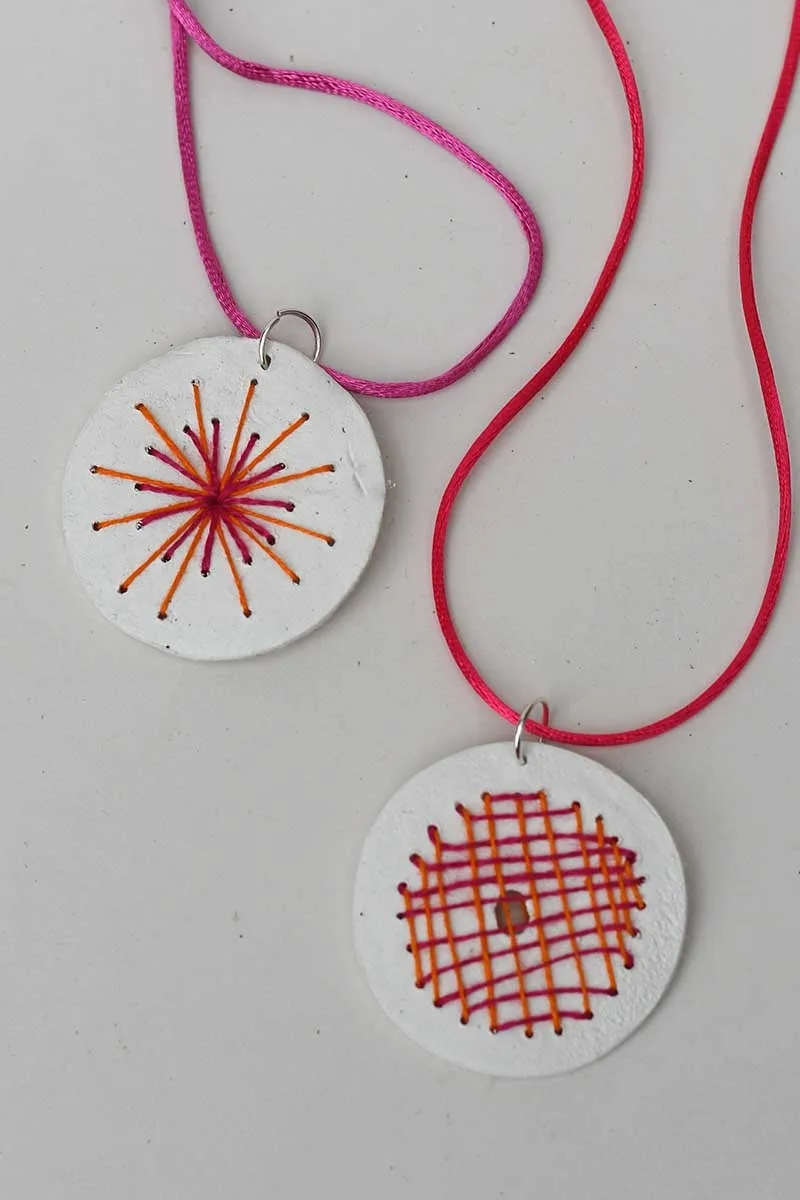
Sunburst Design
I used two different coloured threads for these pendants. The first coloured thread stitch is from the centre hole to each of the outer holes on the clay.
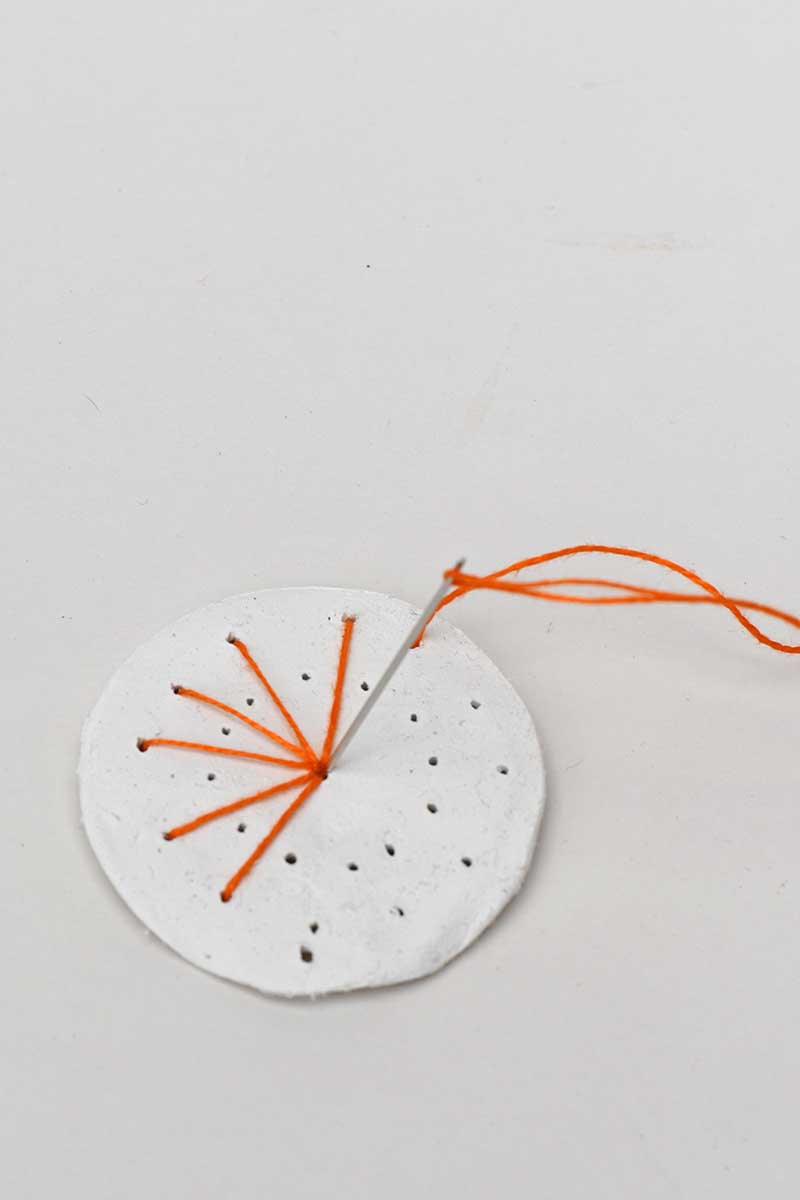
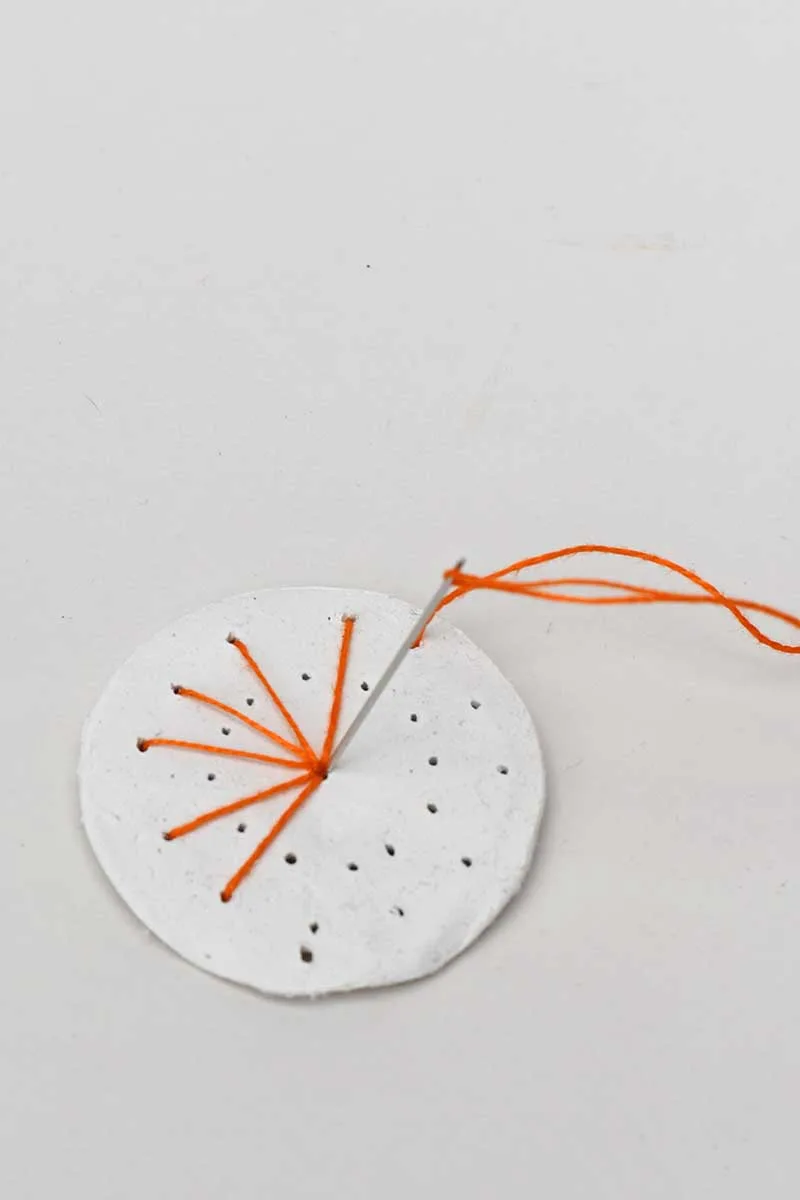
Then, with the second colour, stitch from the centre to the inner circle of the holes.


Lazy Daisy Embroidery Design
The Lazy Daisy stitch, or the detached chain stitch, is perfect for creating simple, elegant petal shapes on your embroidered clay pendants. Here’s a step-by-step guide to help you master this stitch:

- Thread your needle and tie a knot at the end of your embroidery thread.
- Bring your needle up through the centre of the clay at the starting point of your petal.
- Insert the needle back into the same hole and bring it up through the clay at the tip where you want the petal to end, creating a small loop of thread.
- While holding the loop with your thumb, pull the thread through until the loop lies flat on the clay surface. Then, insert the needle outside the loop to secure it in place.
- Bring the needle back up at the starting point for the next petal and repeat the process.
The Lazy Daisy stitch is simple yet versatile, making it an excellent choice for adding floral designs to your embroidered clay pendants. Experiment with different sizes and colours to create beautiful, personalized pieces. Check out this video for a demonstration of the stitch.
Woven Spider Web Stitched Air Dry Clay
The Woven Web stitch, or the Spider Web stitch, is beautiful and intricate, perfect for adding texture and depth to your embroidered clay pendants. Here’s a step-by-step guide to help you create this eye-catching stitch:

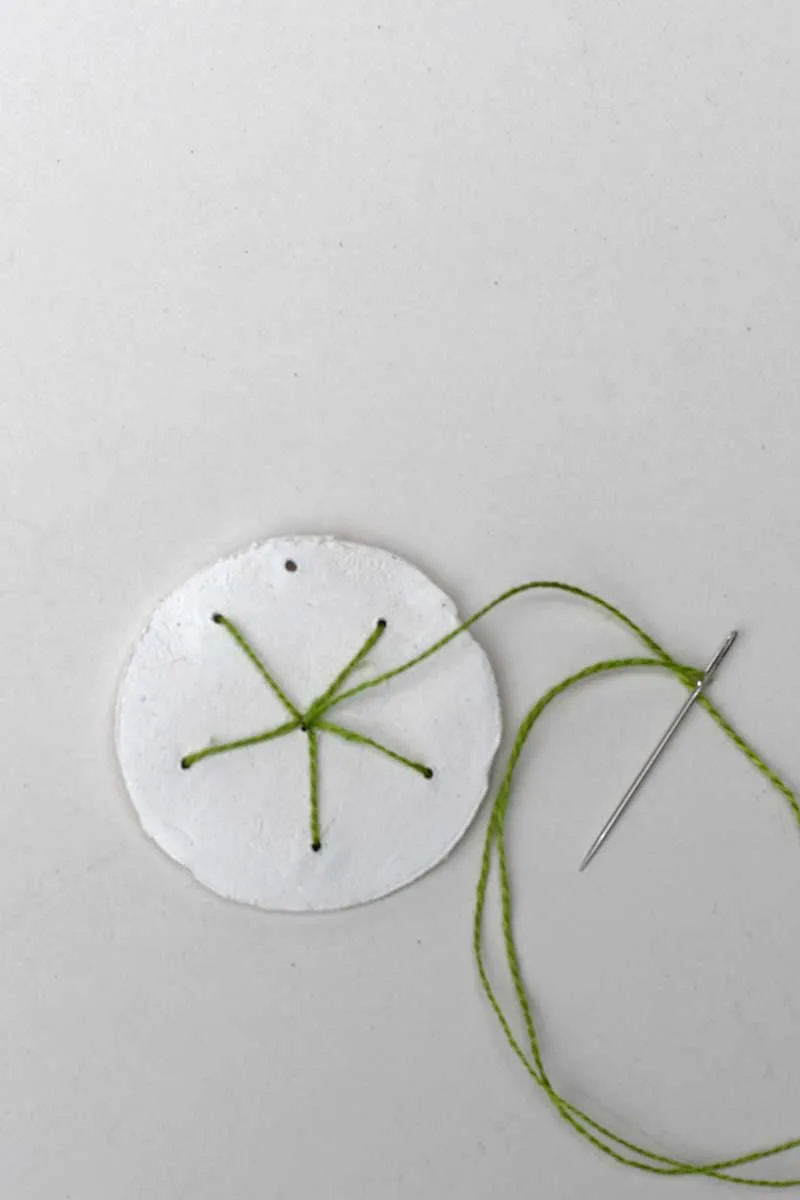
- Thread your needle and tie a knot at the end of your embroidery thread.
- Bring your needle up through the clay at the starting point of your web. This will be the centre of your web.
- Create several straight stitches radiating out from the centre point, evenly spaced like the spokes of a wheel. Typically, 5 to 7 spokes work well.
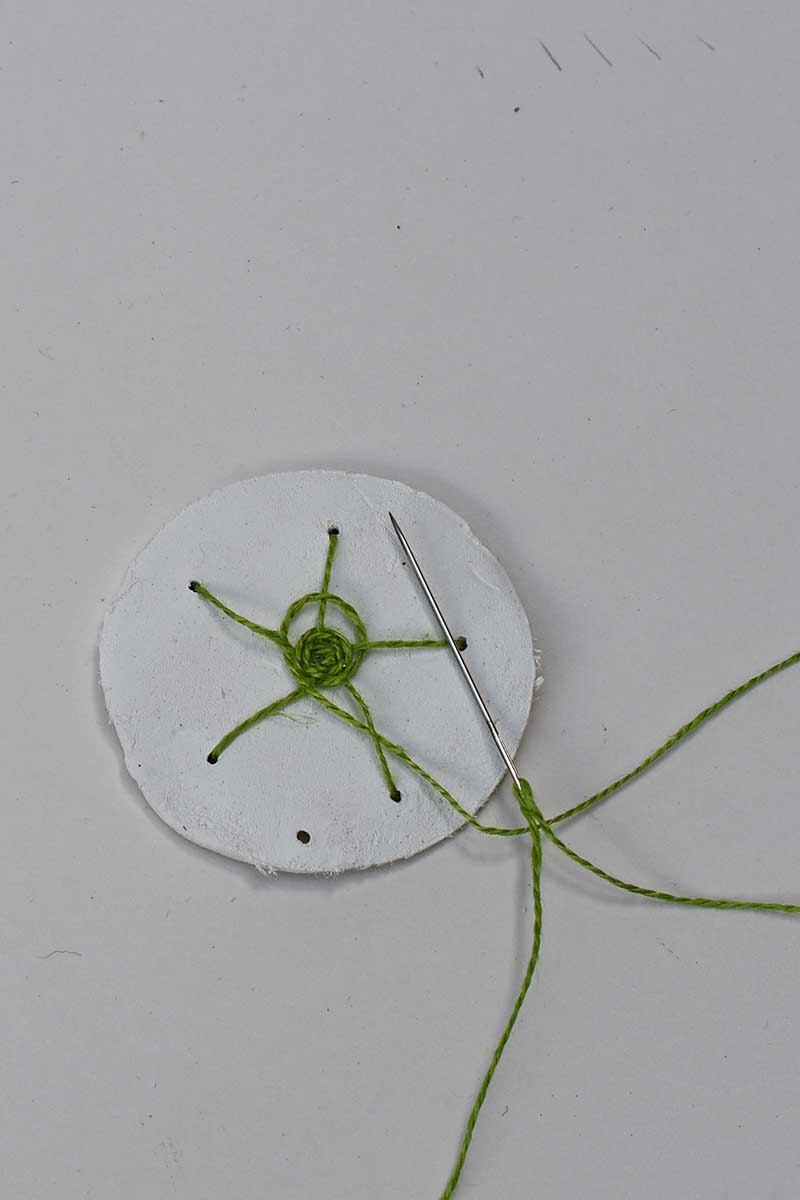
- Bring your needle up at the centre again and start weaving. You will work your way around the spokes in a circular pattern.
- Weave the thread over and under each spoke alternately. Pull the thread gently to keep the web tight but not too tight to distort the shape.
- Continue weaving around the spokes, over and under, keeping the rows close together to form a neat, even web. Keep going until you reach the desired size of your woven web.
- When your web is the size you want, bring the needle to the back of the clay and tie off the thread with a small knot. Trim any excess thread.

The Woven Web stitch adds a lovely dimensional effect to your pendants and can create floral centres, sunbursts, or abstract designs. Experiment with different thread colours and thicknesses to achieve various effects.

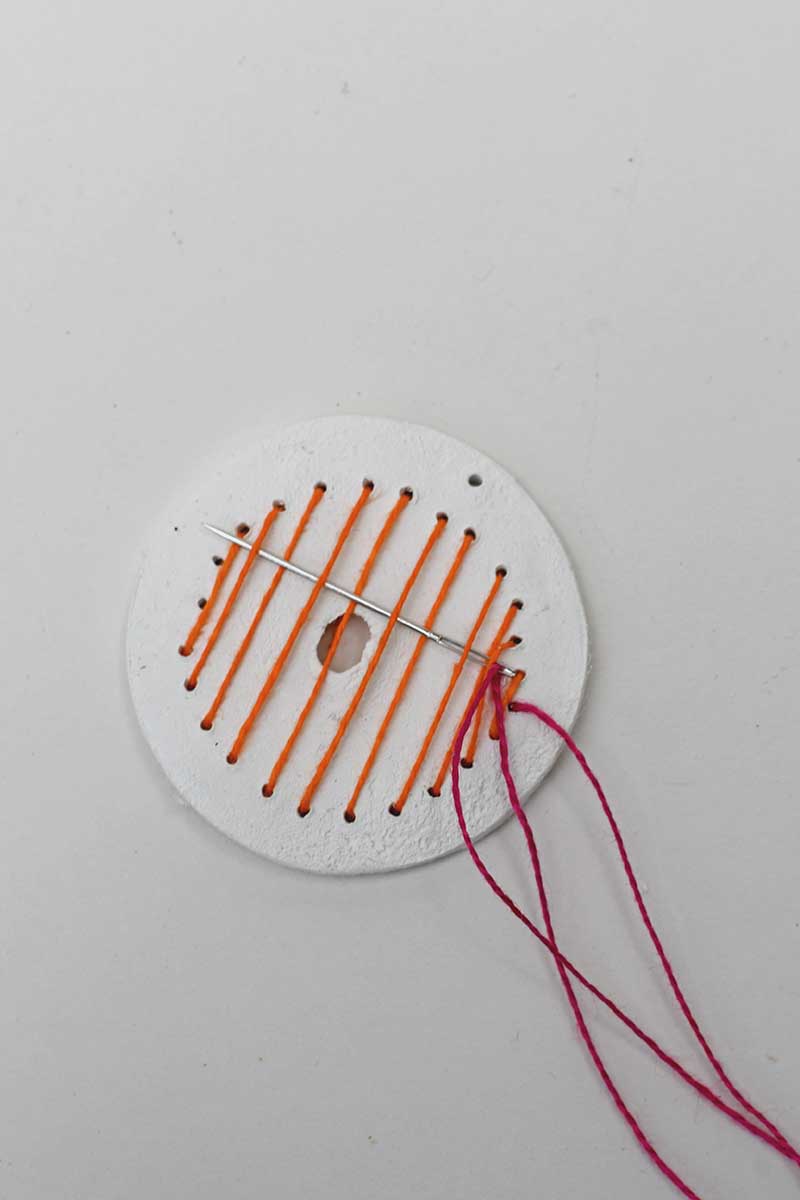
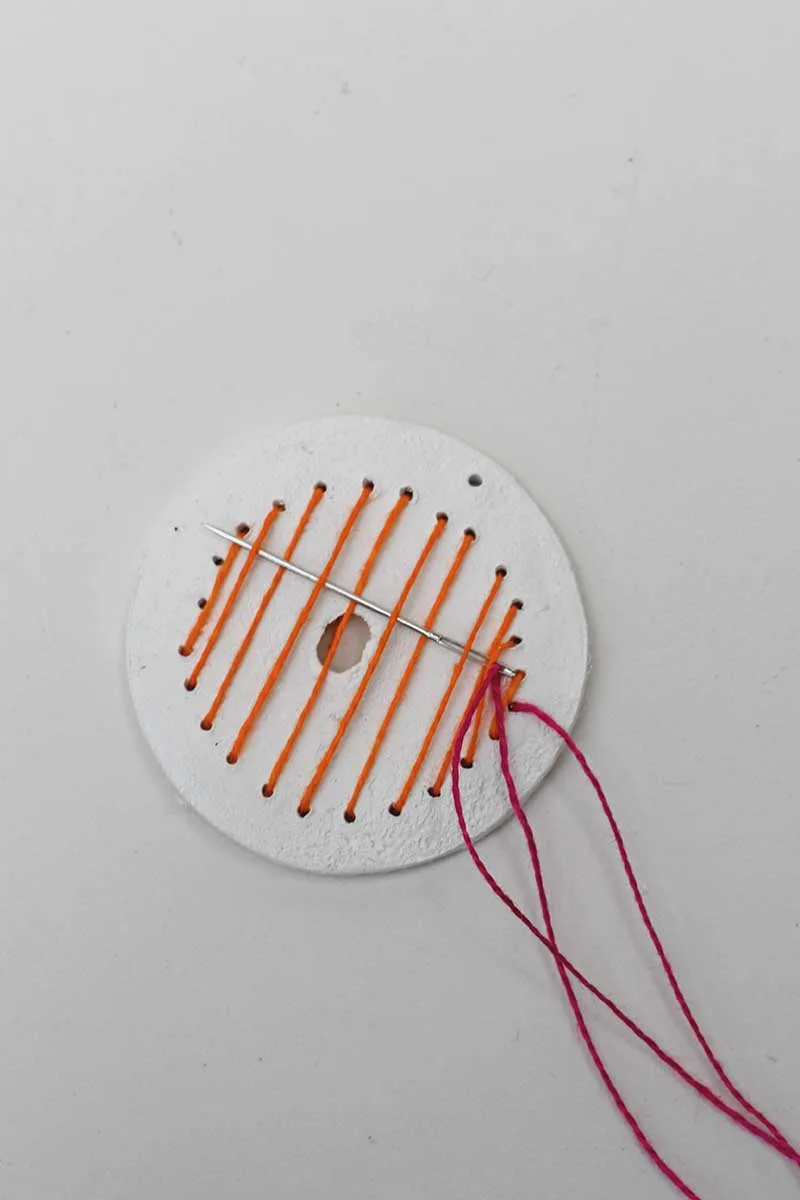
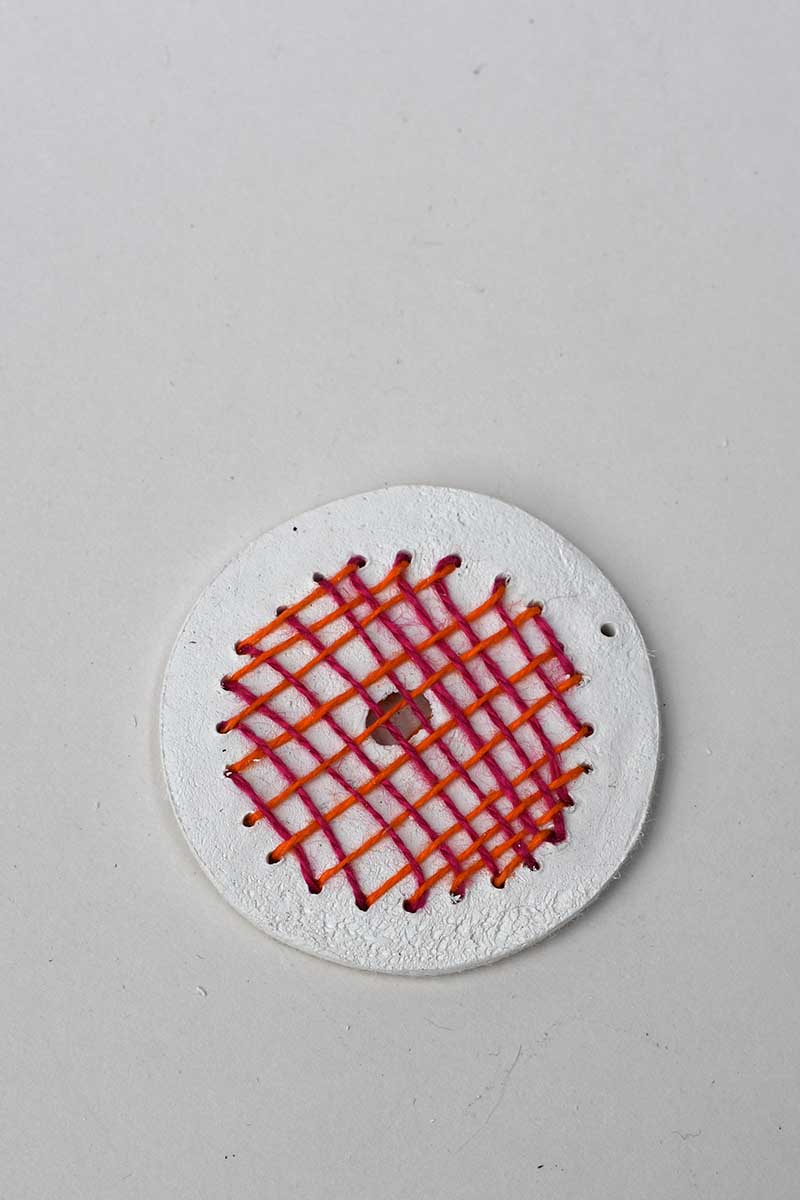
Weave Embroidery Design
This is a straightforward pattern to create on the clay. First, use one thread colour to stitch long, straight lines from the top of the disc to the bottom, forming vertical stripes. Then, take a different colour of thread and weave it in and out horizontally across the vertical stripes, creating a beautiful hatch pattern.

Other Stitch Ideas
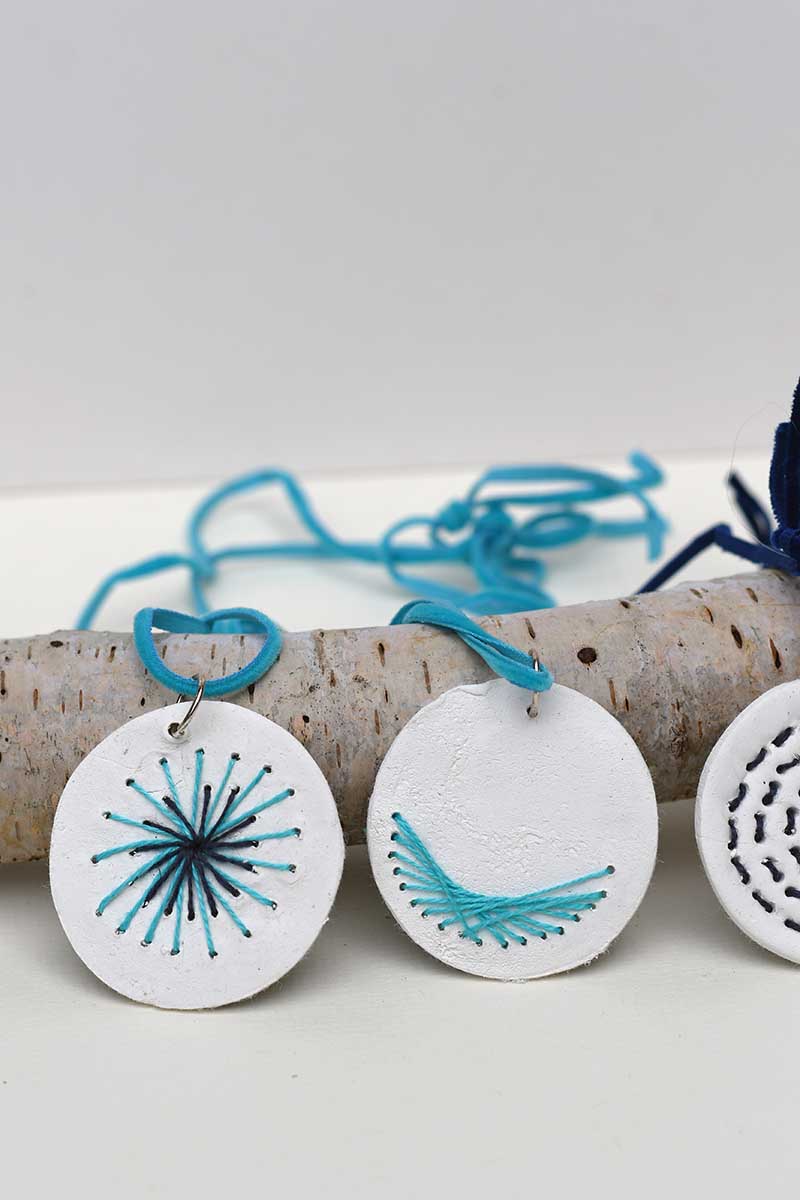
It’s fun to experiment with other simple stitch ideas and combine two or more, like with this running stitch and sunburst pattern.


As I did with this turquoise design, you could even design your pendant patterns using simple string art ideas.

Finish And Assemble
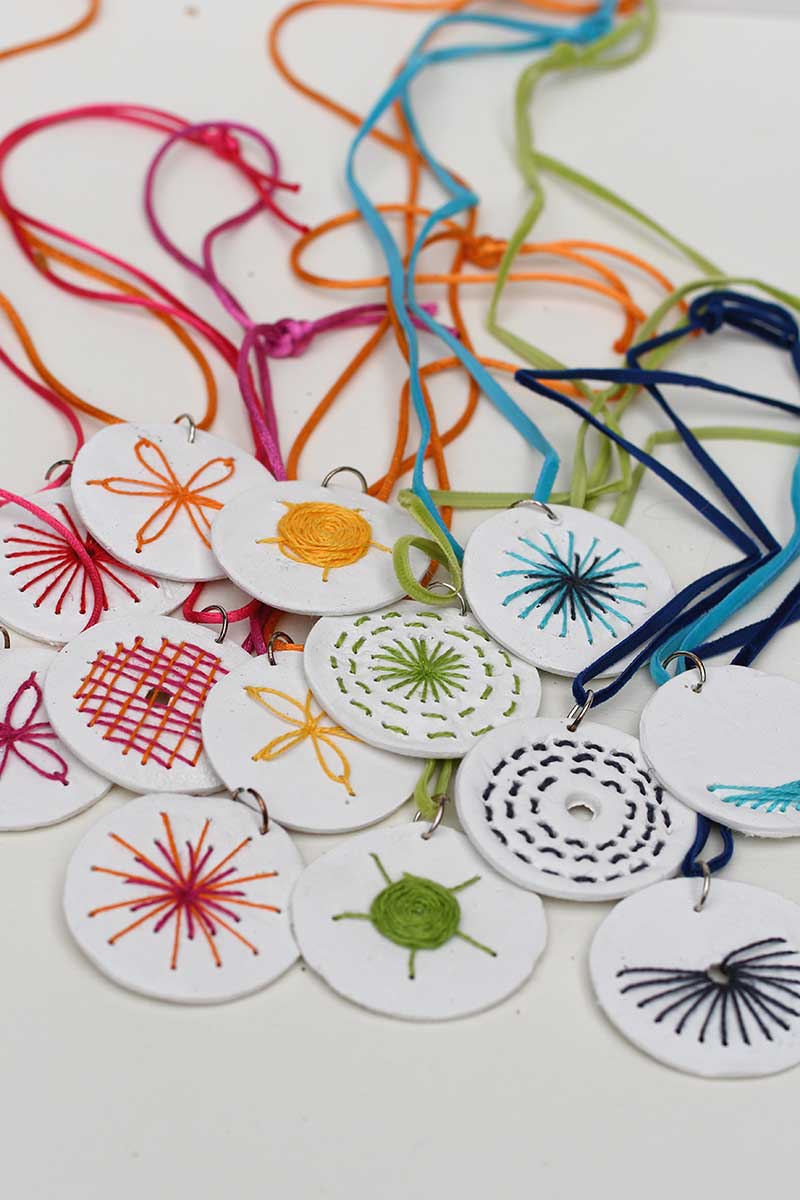
Step 7: Attach a jump ring through the hole at the top of each pendant.
Step 8: String your pendant onto coloured cord or a necklace chain, your beautiful embroidered clay pendant is ready to wear!
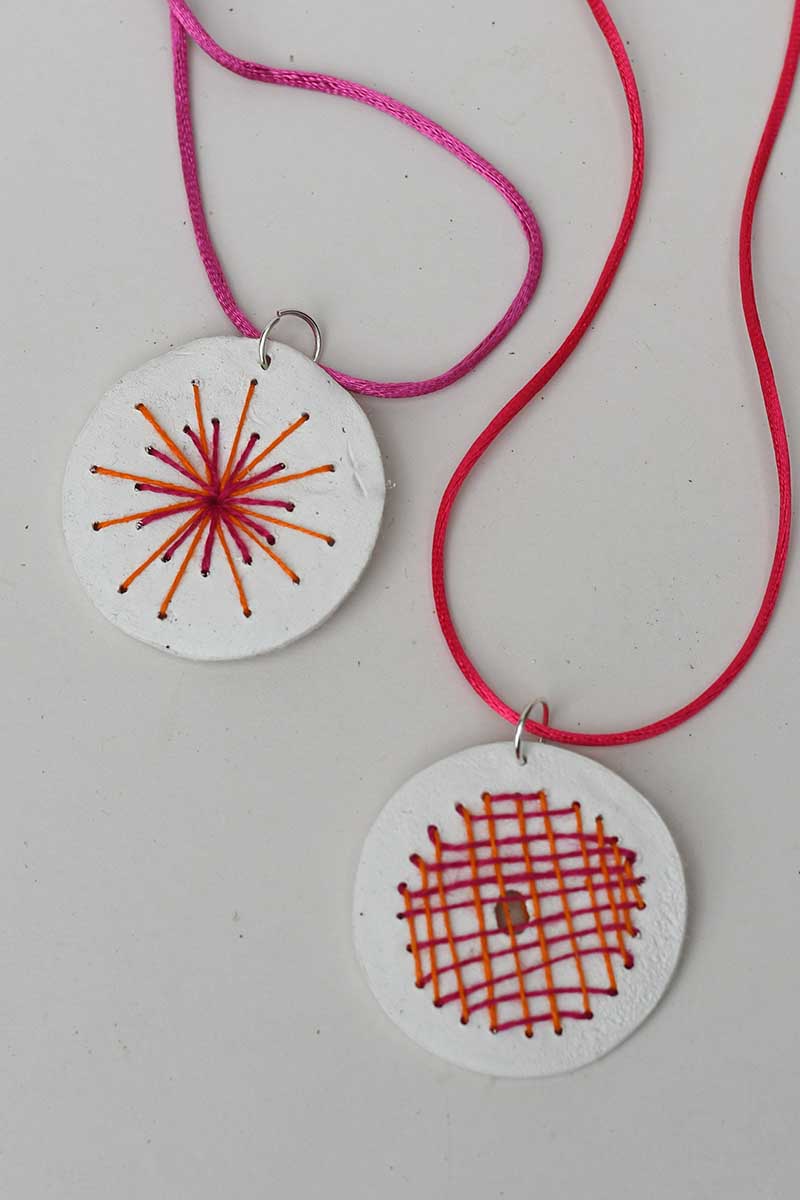
I like to use a cord for my embroidered clay pendants that match the colour of the embroidery thread.

Variation Ideas:
- Personalized Pendants: Embroider initials or names for a personalized touch. Create custom designs for special occasions like birthdays or anniversaries.
- Mixed Media: Use metallic threads or incorporate tiny sequins for a bit of sparkle.
- Themed Designs: Create themed sets of pendants, such as seasonal designs (snowflakes for winter, leaves for autumn).
- Experiment with Shapes: To make your pendants stand out, use different clay shapes, such as hearts, stars, or irregular shapes.
Gifting and Selling & Other Ideas
These embroidered clay pendants make lovely handmade gifts for friends or family. They can also be unique products to sell at craft fairs or online. Each pendant requires only a tiny amount of clay, making this a cost-effective project. Plus, you can use any leftover clay for other air-dry clay crafts, such as these decoupage clay Christmas ornaments.
Are you looking for more unique DIY pendant necklace ideas? Check out my other projects on the blog, including upcycled boho denim pendants, upcycled eyeglass map necklaces, and even necklaces made from avocado pits. There’s something for every style and taste!
If you are looking for bracelets, check out these DIY bracelet ideas.

FAQs
Q: How do I prevent the clay from cracking while embroidering? A: Pre-punch the holes before the clay is completely dry. This makes it easier to stitch through the clay without causing cracks.
Q: What type of thread works best for this project? A: Embroidery floss or thin cotton thread works well. You can also experiment with metallic or variegated threads for different effects.
Q: Can I use polymer clay instead of air-dry clay? A: Yes, polymer clay can be used. Just make sure to bake it according to the manufacturer’s instructions before embroidering.
Q: How do I clean the pendants if they get dirty? A: Gently wipe the surface with a damp cloth. Avoid soaking them in water, which can weaken the clay and thread. You can varnish the clay before embroidering to protect it, but this will give it a glossy finish.
Q: Can I paint the clay before embroidering? A: You can paint the clay with acrylic paints or watercolour before adding your embroidery. Just ensure the paint is completely dry before starting.
Q: How long do the pendants take to dry? A: Drying time varies based on the thickness of the clay and the humidity in your area. Typically, air-dry clay takes 24-48 hours to dry completely.
Q: Can kids make these pendants? A: This project is excellent for kids with adult supervision, especially for the pre-punching and embroidery steps.
Q: How durable are these pendants? A: Once dry, the pendants are fairly durable, but they should be handled with care to avoid breaking the clay or pulling the threads loose.
Q: Can I use these pendants for other purposes? A: Absolutely! They can be used as keychains, ornaments, or added to other craft projects.


Julie Briones
Tuesday 23rd of July 2024
These are so clever and special, Claire! Thanks for sharing at Tuesday Turn About! I'm delighted to be featuring your post at this week's party!
Claire Armstrong
Tuesday 23rd of July 2024
Thank you so much, I look forward to seeing it.
creativejewishmom/sara
Monday 22nd of July 2024
Wonderful as always! thanks so much for sharing on craft schooling sunday!
Claire Armstrong
Monday 22nd of July 2024
Thank you Sara, and thanks for hosting.
Michelle
Saturday 20th of July 2024
So cute! I love this idea. Pinning!
Claire Armstrong
Sunday 21st of July 2024
Thank you so much, they were fun to make.
Julie Briones
Friday 19th of July 2024
So pretty! Love your unique upcycles and crafts, Claire!
Claire Armstrong
Saturday 20th of July 2024
Thank you so much, I just like trying new ideas
Beth
Wednesday 17th of July 2024
Followed and Pinned! Creatively, Beth